
Publicidade
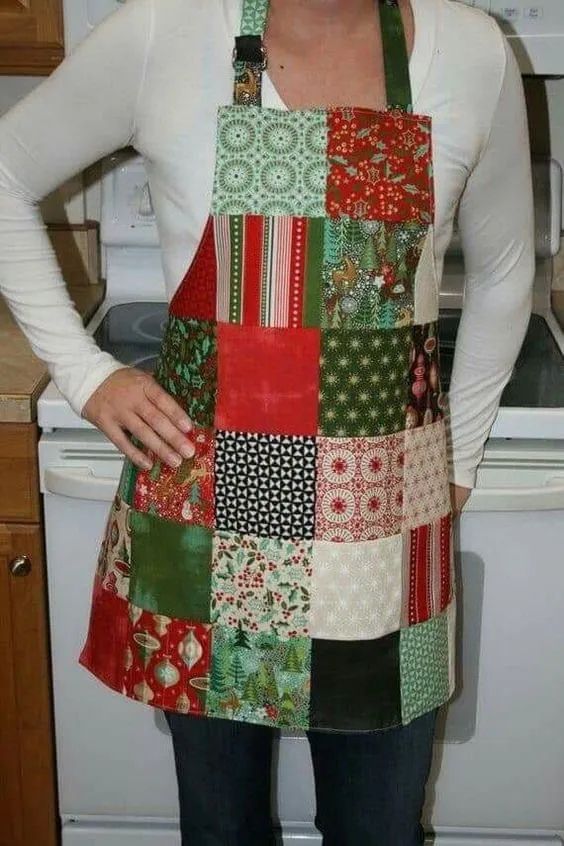
The patchwork apron in the image is a fun and accessible project for those starting to sew. It uses various scraps of fabric to create a cheerful and unique look, with pockets that are either the same color or different colors for everyday practicality. Follow this simple step-by-step guide to create your own patchwork apron.
Publicidade
Materials needed:
- Fabric scraps in different colors and prints (2 to 4 types is sufficient)
- Lining fabric (optional, for added strength)
- Plain fabric for the apron lining (optional)
- Measuring tape or ruler
- Fabric pencil or tailor’s chalk
- Sharp scissors
- Pins
- Fabric thread and sewing machine needle (or hand sewing thread)
- Sewing machine (or thick needle for hand sewing)
- Snap buttons or pocket fasteners (optional)
- Simple apron pattern (back wall with shoulder width and length)
Step-by-step:
-
Design planning
- Define the apron size (child, youth, or adult). A common size for beginners is an adult apron approximately 78–90 cm long.
- Choose 4–6 scraps for the main body, plus 2–3 smaller scraps for pockets and details.
- Decide on the order of the patchwork pieces (for example, 20 cm x 20 cm squares, as in the photo).
-
Preparing the scraps
- Wash and iron the scraps to remove shrinkage and creases.
- Cut each scrap into equal rectangular or square shapes (20 cm x 20 cm is a common size for beginners).
- If desired, include lining for greater durability: cut two scraps of the same size for the body and one for the lining, if preferred.
-
Assembling the apron body
- Arrange the scraps on the surface, forming the desired pattern.
- Join the scraps in smaller strips or modules with a 0.5–1 cm seam allowance.
- Join the strips together until the complete apron body is formed. Check the length to adjust to the desired size.
- Make a single piece of fabric for the front.
-
Pockets
- Choose two scraps for the pockets (they can be from the same fabric or different fabrics).
- Cut two scraps of fabric to the desired size (for example, 15 cm x 15 cm).
- Fold the edges 0.5 cm inward and sew around to finish.
- Pin the pockets in the desired position (front of the apron).
- Sew the pockets, leaving a 0.5 cm seam allowance.
-
Preparing the straps
- Cut two strips of fabric approximately 6–7 cm wide and 70–80 cm long each (adjust according to the size of the torso).
- Fold the strips in half lengthwise, sew along the edge to give firmness and turn inside out.
- Attach the straps to the top of the apron, aligning them with the top edge. Make reinforced seams for greater durability.
-
Final assembly
- Join the front body with the lining (if any), sewing around the edges with a 0.5–1 cm seam allowance.
- Leave a small opening at the back to turn the apron inside out, if applicable. Turn it right side out and press well to align it.
- Topstitch around the edge for a final finish.
-
Final Details
- Add snap buttons or rings to attach the straps, if desired.
- Stretch and iron the apron to make it stiff and look good.
- Quick wash to remove any chalk marks and give it a finishing touch.
Useful tips for beginners:
- Start with similar-sized scraps to make sewing easier.
- Use thread and needle compatible with the fabric to avoid tearing.
- Take your time: sew calmly and check the alignment between scraps before sewing.
- If time allows, experiment with different patchwork patterns, such as 4×4, 30 cm blocks, or irregular squares.
Creative variations:
- The apron can have pockets in contrasting colors for emphasis.
- Use fabrics with light patterns for the body and more resistant fabrics for the straps.
- Add a floral or striped lining for a personalized touch.
Conclusion:
With patience, this patchwork project is perfect for beginners to practice basic sewing, alignment, and finishing techniques. The result is a beautiful, functional, and unique apron that can brighten up any kitchen.