
A cute, handcrafted doll made with colorful fabric scraps in various patterns.
Ideal for decoration, a small gift, or a creative sewing project.
Level: Beginner to intermediate (depends on experience with home sewing).
Materials needed:
Assorted fabric scraps (cotton, chintz, felt) in soft colors.
Base fabric for the body (two pieces: head/neck and torso).
Simple dog pattern (or freehand drawing).
Stuffing: polyester fiber or acrylic batting.
Threads in the same colors as the fabric scraps.
Sewing machine needle or hand sewing needle.
Scissors, pins, chalk or fabric marker.
Safety eyes or beads for the eyes (or black fabric for embroidery).
Buttons for details (nose, ear optional).
Measuring tape.
Patterns for ears, head, torso, paws, tail (or draw on paper).
Finishing tape or bias tape for the outline if you want a professional finish.
Decorative ribbon or bow for the neck.
Fabric glue dots (optional, if you prefer to secure some parts before sewing).
Step 1: Planning and Design
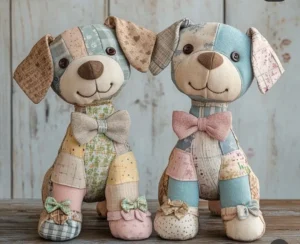
Image note: there are two patchwork dogs with patchwork patterns, simple faces with asymmetrical ears, bow ties, and paws with small bow details.
Decide on the size: for example, final dog ~28–35 cm tall.
Choose a patchwork set for each body part, maintaining color balance (pastel tones with vintage touches).
Step 2: Creating the Patterns
Draw or print simple patterns for the head, torso, paws, ears, and tail.
Divide the body into patchwork sections: for example, each torso/head area can have 2–3 matching patchwork pieces.
Transfer the patterns to paper or cardboard and then to the fabric.
Tip: If you prefer, use the “block patchwork” method with squares or rectangles that are added together to form the final shape.
Step 3: Cutting and sewing patchwork
Cut the fabric blocks according to the desired layout.
Sew the patchwork pieces onto each body part (head, torso, paws) forming panels.
Make smooth seams with a straight stitch on the machine or by hand.
Always leave seam allowances of 0.5 cm (or according to your machine).
Step 4: Assembling the body pieces
Join the panels to form the head, torso, and paws, leaving space for stuffing.
Add the neck between the head and torso.
Do not tighten the seams too much to prevent the stuffing from showing through the seams.
Step 5: Stuffing
Fill each part with polyester fiberfill, starting with the head to maintain the shape.
Use small touches to fill corners, ears, and paws, ensuring a smooth shape.
Close the openings with an invisible stitch.
Step 6: Face and Ear Details
For the eyes: use safety eyes or sew beads/embroidery with black thread.
Nose: use a Pentel or a piece of brown/black felt sewn on.
Simple smile: sew black thread with a backstitch.
Ears: attach the ears around the top of the head with stitches, leaving a slight drop to the side, as in the image.
Step 7: Final Body Assembly
Attach the head to the torso with a firm stitch.
Glue or sew the front and back legs to the torso, maintaining proportional dimensions.
Add details: bows on the legs with ribbon or fabric strips, or fabric bows to reproduce the style of the image.
Step 8: Accessories and Finishing
Make bow ties with contrasting fabric and sew or attach them to the neck with an invisible stitch.
Add decorative bows to the legs or around the neck for a handcrafted touch.
Apply any additional patchwork patches to enrich the look.
Step 8: Make small stitches to give the impression of skin or light stitching along the contours.
Step 9: Finishing
Check all seams, trimming any rough edges.
Check the doll’s balance; adjust the stuffing if necessary.
If desired, apply a light layer of buffering to the areas with edges for greater durability.
Useful tips:
Combine small patterns (polka dots, checks, stripes) to avoid overdoing it.
Use scraps with different textures to add contrast.
If you are a beginner, practice patchwork on small pieces before applying it to the entire body.
Use quilting thread for stronger seams in high-stress areas (paws, neck).
Suggestions for variations:
Replace the ties with ribbon bows or sew on ties with different patterns.
Make versions with larger ears for a cuter look.
Add smaller patchwork pockets to decorate features.
Conclusion:
With patience and creativity, it’s possible to recreate a charming patchwork puppy inspired by the image. Use light colors, varied patchwork patterns, and finish with delicate details to achieve that cozy, handcrafted style.