
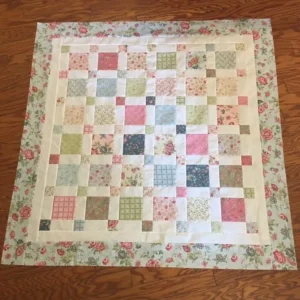
A patchwork quilt is a charming, cozy piece full of personality. The model shown in the image combines small patterned squares, light-colored stripes that organize the design, and a delicate floral border. This project is ideal for both beginners and those who already sew and want an elegant and timeless result.
Materials Needed:
• Scraps of 100% cotton fabric (various prints)
• Light-colored fabric (for the strips between the blocks)
• Printed fabric for the outer border
• Fabric for the back of the quilt
• Acrylic batting
• Sewing thread
• Ruler, rotary cutter, and cutting mat
• Sewing machine
• Pins or clips
• Iron
Suggested Measurements (can be adapted)
• Printed squares: 10 x 10 cm
• Light-colored strips (sash): 4 x 10 cm (vertical) and 4 x row width (horizontal)
• Light-colored inner border: 5 cm wide
• Printed outer border: 10 cm wide
Step-by-Step:
1. Design Planning
Before sewing, arrange the printed squares on a flat surface. Mix colors and prints in a balanced way, avoiding repeating identical fabrics side by side. This step is essential for a harmonious look.
2. Cutting the Fabrics
• Cut all the patterned squares to the same size.
• Cut the light-colored strips that will go between the squares.
• Cut the strips for the inner and outer borders.
Maintaining precision in cutting ensures that the quilt is well aligned.
3. Assembling the Blocks
• Sew a light-colored strip to the right side of each patterned square.
• Join the squares in rows, always interspersed with the light-colored strips.
• Iron the seams, preferably opening them all to the same side.
4. Joining the Rows
Between each row of squares, sew a horizontal light-colored strip. This creates the “grid” effect seen in the image, highlighting each piece individually.
5. Applying the Borders
• First, sew the light-colored inner border around the entire top.
• Then, apply the patterned outer border, which acts as a decorative frame.
Iron well after each step.
6. Sandwich Assembly
On a large surface:
1. Place the backing fabric right side down.
2. Place the batting on top.
3. Place the quilt top right side up on top of that.
Pin securely to prevent shifting.
7. Quilting
Quilt along the lines of the light-colored strips or create simple designs. This can be done by machine or by hand, according to your preference.
8. Finishing (Bias Binding)
Finish the edges with bias binding made from the same fabric as the outer border or from a neutral fabric for a delicate finish.
Final Tips:
• Choose fabrics of the same thickness to facilitate sewing.
• Light tones in the strips help to highlight the patches.
• This technique can be adapted for blankets, baby quilts, or table runners.