
Handmade patchwork quilt, colorful, cozy, and safe for children.
Combines patchwork panels with a themed center (cute animal) and colorful borders.
Level: beginner to intermediate (depends on experience with patchwork sewing).
Materials needed:
Scraps of 100% cotton fabric in soft colors and children’s prints.
Base fabric for the lining (cotton or lightweight fleece) and terry cloth for the face (optional, for a soft finish).
Center pattern (e.g., cute patchwork animal) or freehand drawing.
Lightweight stuffing (optional: thin acrylic batting) to make the quilt padded.
Strong sewing thread in the colors of the scraps.
Sewing machine needle and/or hand sewing needle.
Scissors, pins, chalk or fabric marker.
Trimming scissors, patchwork ruler, and rotary cutter (make things easier).
Measuring tape.
Felt or adhesive felt for simple details (eyes, nose).
Finishing trims (bias tape, edge banding).
Optional: quilting machine for sewing the quilt layers together.
Clothespins or cardboard clips (to hold the layers together during quilting).
Step 1: Planning and Design
Define the final size of the children’s quilt (e.g., 120 x 150 cm or 90 x 110 cm for a crib).
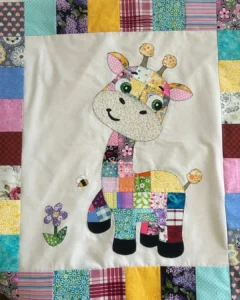
Choose the central theme: a cute patchwork animal (it could be a giraffe or baby giraffe, as a reference in the image). Use patchwork pieces in pastel colors.
Plan the border/frame with wide colored strips or smaller patchwork blocks to create the quilt’s visual language.
Step 2: Building the Patchwork Center
Draw the outline of the animal (or print a simple template). Divide the body into sections for patchwork: head, neck, torso, paws.
Cut rectangular/square blocks of uniform size (e.g., 4 x 4 cm) to form each part of the animal.
Assemble the patchwork pieces of each part into panels, sewing right sides together and turning to the wrong side.
Join the panels to form the head, torso, paws, and ears. Ensure the seams are aligned.
Step 3: Preparing the edges and base
Cut the base fabric (lining) to the desired size.
If using quilted batting, position it between the patchwork top (animal) and the lining, securing with side pins.
Add a simple hem finish or bias binding to finish the edges.
Step 4: Assembling the quilt
Align the patchwork top with the batting (if used) and the lining. Use pins to secure in layers.
Step 4: Simple quilting: sew around the animal shapes or create straight parallel lines all around the piece. If you don’t have a quilting machine, hand-sew with medium stitches along the seams.
Step 5: Animal Details
Add facial and ear details with appliqué or stitching. Use felt for the eyes, nose, or black thread for the smile.
For the patchwork version of the ear/neck, use small scraps to add texture and depth.
Add black outlines with dark thread for definition (simple embroidery).
Step 6: Borders and Finishing
Border the quilt with continuous patchwork strips or wide bias tape for a smooth finish.
Consider a soft fabric border or light-colored batting to make the result gentle on babies.
If desired, apply a fabric-safe varnish finish to the edges (optional).
Step 7: Safety Check and Washing
Check each stitch to avoid loose ends that could snag the child’s skin.
Washing instructions: Wash the quilt carefully in cold water with mild detergent. If possible, use a delicate cycle.
Useful tips:
Vary the patterns, but keep a soft palette to avoid excessive contrast.
For beginners, create the center with a few blocks and add patchwork gradually.
Use simple machine stitches for greater durability.
Do test stitches on scraps before sewing the entire quilt top.
Suggestions for variations:
Change the theme to patchwork with different animals (bunny, teddy bear, puppy) to diversify the quilt line.
Include small patchwork pockets in the quilt for decorative purposes or to store minifigures.
Use fabrics with cloud, star, or polka dot prints for an even more childlike aesthetic.
Conclusion:
With dedication and creativity, it’s possible to transform colorful scraps into a charming, cozy, and safe children’s patchwork quilt. The secret lies in the harmony of the colors, the quality of the finishes, and the personalization of the central theme.