
Style Summary
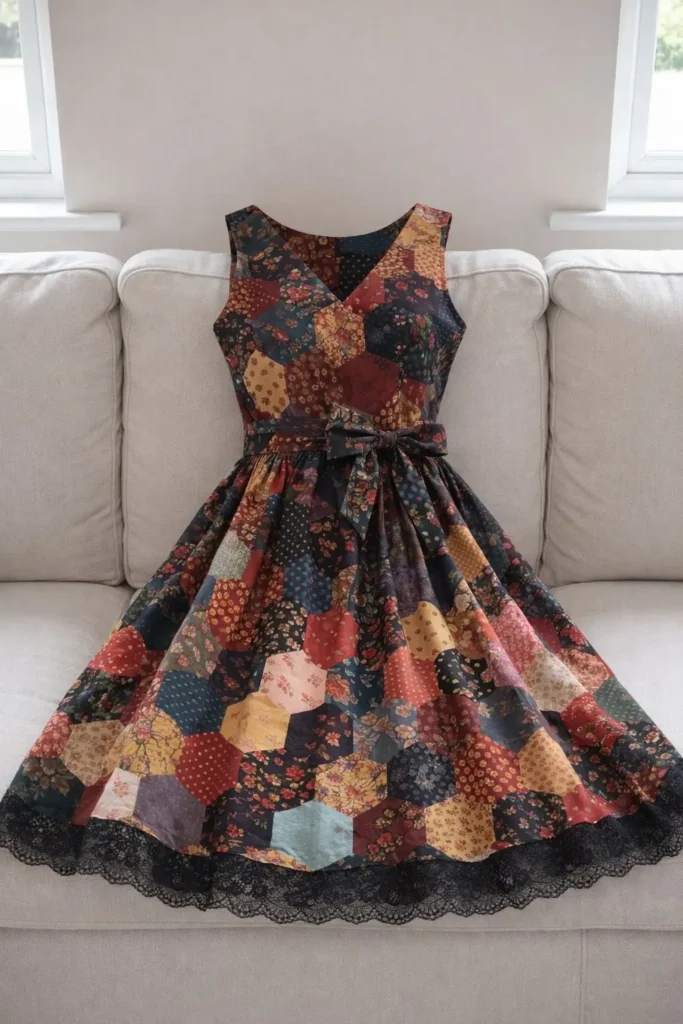
• Long or midi dress, sleeveless, with a V-neck.
• Bodice in hexagonal patchwork (or other mosaic of hexagonal shapes).
• Waist defined with a bow/sash-type trim.
• Hem with black lace for an elegant touch.
• Ideal for reusing scraps of old clothes, giving new life to printed fabrics, and creating a unique piece.
Materials Needed
• Scraps of lightweight cotton or viscose fabrics (preferably small to medium prints to facilitate the mosaic).
• Kraft paper or parchment paper for the pattern.
• Sharp fabric scissors.
• Tapestry ruler, measuring tape, and fabric chalk.
• Adhesive tape or wax for cutting out the hexagons (or hexagon template).
• Pins, good quality sewing thread, and appropriate needle.
• Sewing machine (or craft thread for hand stitching).
• Lining in roughly the same color as the main fabric (optional, increases the dress’s thickness).
• Measuring tape, invisible zipper (if desired).
• Black lace trim for the hem (or cotton lace) and matching thread.
• Waistband tie (or just a plain strip of fabric).
• Iron.
1. Design Planning and Measurements
• Decide on the final length of the dress (e.g., midi to mid-calf).
• Determine the bodice size (bust, waist, hips). If in doubt, use standard measurements or make a prototype in a smaller size.
• Define the layout of the hexagons: 3 to 5 columns per row, alternating colors to create a harmonious mosaic. Consider a slight gradient of warm tones to match the black lace on the hem.
2. Creating the Pattern and Patchwork
• Draw hexagons of equal size (e.g., 2.5 cm on each side). Use a hexagon template or draw with a ruler.
• Cut enough scraps to sew several hexagons together. Assemble a sample in practice to see the color palette.
• Assemble the front panel of the dress (bodice) in several rows of hexagons, aligning the edges to maintain a straight shape. Use pins to secure the patchwork to the paper or the fabric itself to facilitate sewing.
• Prepare the lining, if using, by cutting it to the same shape as the front panel.
3. Assembling the Front Panel
• Common methods:
o Machine sewing: sew hexagon to hexagon with diagonal seams, always right sides together, to avoid gaps.
o Invisible stitching: use the “mosaic patchwork” technique with small stitches so that the joins are smooth.
• After sewing all the hexagons together into one piece, iron to set the seams.
4. Making the top (bodice)
• Cut the top pattern based on the measurements: front and back in one piece or two (front and back) with a dart for the V-neck.
• If desired, add a slight dart at the bust for a better fit.
• Sew the sides of the bodice, leaving openings for the shoulder pins.
5. V-neck and straps
• Define the V-neck on the center line of the bodice. Mark the cutout with chalk and cut carefully so as not to damage the patchwork.
• Cut two strips of fabric for the straps (approx. 2–4 cm wide, with the length appropriate to the shoulder measurements). Fold in half and sew around to create reinforced straps. Attach the straps to the shoulders of the bodice.
6. Waistband and Bow
• Cut a strip of fabric 4–6 cm wide and twice the waist circumference to form the bow.
• Sew the strip, turn it inside out, and iron it to smooth it out.
• Attach the strip to the waistline of the bodice, aligning it with the center front. Make a bow or tie it like a belt. You can leave the ends hanging down or form a fixed bow.
7. Lining (optional)
• If desired, sew a lining for the garment. Cut the lining in the same shape as the bodice (front and back) without such a deep V-neck.
• Attach the lining to the bodice, aligning the seams of the top, and sew the sides, leaving space for the zipper, if there is one.
8. Patchwork Skirt
• Cut the rectangle of the skirt based on the desired size. The skirt can be A-line (straight) with a wide hem for the patchwork.
• Sew the top of the skirt (bridge between the bodice and the skirt) with an adjustment dart to soften the drape.
• If desired, make a small overlap cut to facilitate the drape of the skirt.
9. Lace Hem
• Cut the black lace to the same length as the circumference of the dress hem plus a few centimeters for the fold.
• Attach the lace to the bottom edge of the skirt with alignment adjustments so that the pattern remains uniform.
• Make an invisible stitch to secure the lace, or use a blanket stitch on the bottom edge.
10. Final Touches
• Check the entire piece on a flat surface. Make adjustments to the fit, seams, neckline, straps, and bow.
• Hem the garment to the desired height. Use a simple fold or an invisible stitch for finishing.
• Iron carefully, keeping the patchwork flat and without puckering.
Additional Tips:
• Color palette: opt for a mix of warm tones (red, mustard, brown, wine) with touches of blue or green to create a pleasant contrast.
• Hexagonal patchwork looks even better with black, brown, or beige borders.
• If you are a beginner, start with a smaller top or a simple patchwork skirt before moving on to the complete set.
• Use an invisible zipper only if you need an opening to dress with the patchwork. Otherwise, opt for covered buttons or a simple front opening.
Quick pattern making for beginners (optional):
• Make a smaller sample piece to test fit and neckline adjustment, then reduce the pattern to the final size.
• Use parchment paper to assemble the patchwork before cutting the final fabric; it makes it easier to see the look without wasting scraps.