


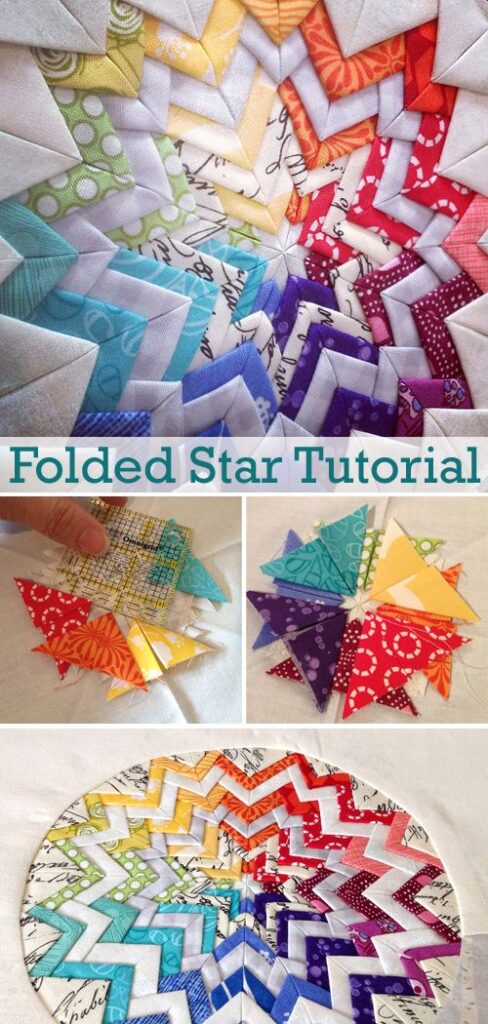
The Folded Star quilt pattern is a beautiful and intricate design that looks complex but is surprisingly simple to create, even for beginners.
This pattern involves a combination of folding and layering fabric to create a stunning star motif.
In this guide, we will provide detailed instructions to help you create your own Folded Star quilt.

Materials Needed
- Fabric: Choose four different fabrics that complement each other. You will need fabric for the star layers and a background fabric.
- Quilting Ruler: A clear quilting ruler for precise cuts.
- Rotary Cutter: To cut your fabric accurately and efficiently.
- Cutting Mat: To protect your work surface and ensure accurate cutting.
- Thread: Coordinating thread for piecing and quilting.
- Sewing Machine: While you can sew by hand, a sewing machine will make the process faster.
- Iron and Ironing Board: For pressing your fabric and seams.
- Batting: For the middle layer of your quilt.
- Backing Fabric: A large piece of fabric for the back of your quilt.
- Binding Fabric: For the edges of the quilt.
- Pins: To hold layers in place.
Abbreviations
- WOF: Width of Fabric
- ¼” seam: Quarter-inch seam allowance
Step-by-Step Instructions
Cutting the Fabric
- Star Fabric: Cut the following squares from your four chosen fabrics:
- 16 squares of 3.5” from Fabric A (innermost star)
- 16 squares of 4.5” from Fabric B (second layer)
- 16 squares of 5.5” from Fabric C (third layer)
- 16 squares of 6.5” from Fabric D (outermost layer)
- Background Fabric: Cut one large square of 8.5” from your background fabric for the base.
Preparing the Star Points
- Fold and Press: Take one 3.5” square from Fabric A. Fold it in half diagonally to form a triangle. Press with your iron to set the fold.
- Fold Again: Fold the triangle in half again to form a smaller triangle. Press again.
- Repeat: Repeat the folding process for all 3.5” squares from Fabric A, then move on to the squares from Fabrics B, C, and D.
Assembling the Star
- Center Layer: Place the 8.5” background fabric square on your work surface. Take four folded triangles from Fabric A and position them with the points meeting in the center. Pin in place.
- Second Layer: Take four folded triangles from Fabric B. Position them slightly overlapping the edges of the first layer to form the second layer of the star. Pin in place.
- Third Layer: Repeat the process with the triangles from Fabric C, overlapping the edges of the previous layer.
- Outer Layer: Finally, add the triangles from Fabric D, forming the outermost layer of the star.
Securing the Layers
- Stitch the Layers: Carefully stitch around the edges of each layer to secure the folded triangles to the background fabric. Use a ¼” seam allowance.
- Remove Pins: Once all layers are stitched down, remove any remaining pins.
Creating the Quilt Block
- Trim the Block: Trim the edges of your quilt block to ensure it is square and neat.
- Make Additional Blocks: Repeat the above steps to create as many blocks as needed for your quilt size.
Assembling the Quilt Top
- Arrange the Blocks: Lay out your blocks in the desired arrangement. You can create a single large star or multiple smaller stars.
- Sew the Blocks Together: Using a ¼” seam allowance, sew the blocks together row by row. Press the seams open or to the side, as preferred.
- Join the Rows: Once all rows are complete, sew them together to form the quilt top.
Quilting
- Layer the Quilt: Create your quilt sandwich by layering the backing fabric (right side down), batting, and quilt top (right side up).
- Baste the Layers: Use safety pins or basting spray to hold the layers together.
- Quilt: Quilt as desired, either by stitching in the ditch along the seams or by adding decorative quilting patterns.
Binding
- Prepare the Binding: Cut strips of binding fabric 2.5” wide. Join the strips end-to-end to create one long strip.
- Attach the Binding: Sew the binding to the front of the quilt, aligning the raw edges. Fold the binding over to the back and hand-stitch it down for a clean finish.
Tips for Beginners
- Practice Makes Perfect: If you’re new to quilting, practice folding and pressing the star points on scrap fabric before working on your quilt.
- Use a Design Wall: Lay out your quilt blocks on a design wall or flat surface before sewing them together. This helps you visualize the final design and make adjustments.
- Press Seams: Press your seams as you go to ensure your quilt top lays flat.
- Stay Organized: Keep your fabric squares and triangles organized by layer to avoid confusion during assembly.
- Take Your Time: Precision is key in quilting, so take your time with each step to ensure accuracy and a polished final product.
Congratulations! You’ve completed your Folded Star quilt. This intricate and beautiful quilt is sure to be a cherished addition to your home or a thoughtful gift for someone special. Enjoy your crafting journey and the stunning result of your hard work. Happy quilting!