
The holiday season brings a unique charm, and what better way to celebrate than by creating a cozy quilt?
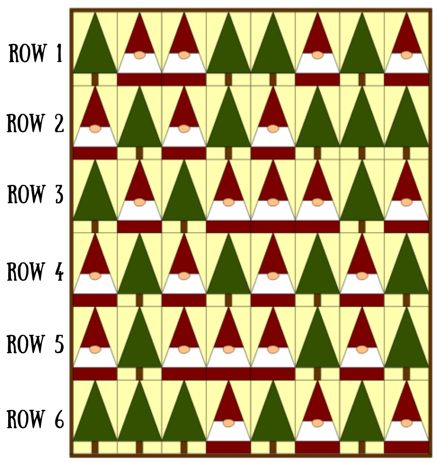
The “Balsam Gnomes Quilt” combines whimsical designs and simple sewing techniques, making it an excellent project for beginners.
In this article, we’ll guide you through each step of the process, ensuring you create a delightful quilt that will bring joy to your home during the festive season.
Materials Needed
Before starting your quilt, gather the following materials:
- Fabric: Choose a variety of fabrics in holiday colors and gnome-themed prints. You’ll need:
- 1 yard of background fabric (preferably in a light color)
- 1/4 yard each of several festive prints for the gnomes
- 1/4 yard for accents (like hats or gifts)
- Batting: A warm batting material for insulation.
- Backing Fabric: 1 yard of fabric for the quilt backing.
- Thread: A neutral thread that complements your fabric choices.
- Quilting Supplies: Rotary cutter, cutting mat, quilting ruler, pins, sewing machine, and an iron.
Step 1: Cutting the Fabric
Start by cutting your fabric into the necessary pieces. Here’s a straightforward guide:
- Background Squares: Cut out 12 squares, each measuring 6” x 6” from your background fabric.
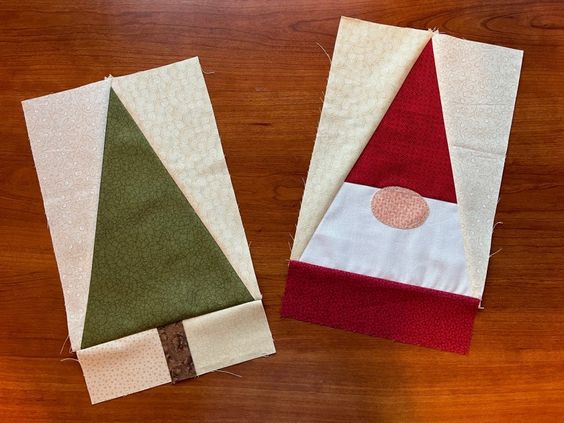
- Gnome Fabric: Cut out various shapes from your gnome-themed prints:
- 12 gnome bodies (approximately 5” tall)
- 12 gnome hats (triangles about 3” wide at the base)
- Optional: Accessories like gifts or snowflakes.
- Accent Pieces: Cut 12 smaller pieces (2” x 2”) for additional details like cheeks or buttons.
Step 2: Preparing the Gnome Pieces
Now it’s time to prepare the gnome components:
- For the gnome bodies, you can either sew pieces together for a patchwork effect or cut them out of a single piece of fabric for a quick approach.
- For the hats, take the triangles and fold the edges down to create a neat point. Press them with an iron for a crisp finish.
Step 3: Assembling the Quilt Top
Begin assembling the quilt top by following these steps:
- Layout: Arrange your background squares and gnome pieces on a flat surface. Experiment with different layouts until you find one you love.
- Sewing Rows: Start sewing the gnome bodies to the background squares. Use a 1/4” seam allowance to ensure they fit well. You might want to sew the hats onto the bodies as well, creating a complete gnome figure.
- Joining Rows: Once you have all your gnome squares completed, sew them together in rows. Make sure to align the seams carefully.
Step 4: Adding Details
To add a personal touch to your gnomes:
- Use the accent pieces you cut earlier to create cheeks or buttons for the gnomes.
- You can also add embroidery or fabric paint to give each gnome a unique personality.
Step 5: Preparing the Quilt Sandwich
Once your quilt top is complete, it’s time to create the quilt sandwich:
- Lay your backing fabric face down on a large, flat surface.
- Place the batting on top of the backing fabric.
- Finally, lay your quilt top face up on the batting. Smooth out any wrinkles to create a flat surface.
Step 6: Basting the Quilt
To secure all layers together:
- Use safety pins or basting spray to keep the three layers from shifting. Pin at regular intervals across the quilt.
- Trim any excess batting or backing fabric if necessary.
Step 7: Quilting
Now comes the fun part—quilting your creation:
- Choose a quilting pattern that you feel comfortable with. For beginners, simple straight lines or a grid pattern work well.
- Using your sewing machine, sew through all three layers, following your chosen design. Go slowly and guide the quilt through the machine with care.
Step 8: Trimming and Binding
After quilting, it’s time to finish the edges:
- Trim any excess batting and backing fabric to align with the quilt top.
- For the binding, cut strips of fabric measuring 2.5” wide. Sew these strips together to create one long strip, enough to go around the entire quilt.
Step 9: Attaching the Binding
To finish the edges of your quilt:
- Sew the binding to the front of the quilt, aligning the raw edges.
- As you approach a corner, fold the binding to create a mitered edge before continuing to sew.
- Once you’ve sewn all the way around, fold the binding over to the back and hand-stitch it in place for a neat finish.
Step 10: Final Touches
After attaching the binding, give your quilt a good press with the iron. This helps to smooth out any wrinkles and gives your quilt a polished look.
You might also consider adding labels or tags to your quilt to commemorate your work or gift it to someone special.
Conclusion
Congratulations! You’ve successfully created your very own “Balsam Gnomes Quilt.” This cheerful quilt will not only keep you warm but also serve as a beautiful decoration for your home during the holidays. Enjoy the process, share your creation with friends and family, and most importantly, have fun quilting! Happy sewing!